
Rhombus UCCW Skins

500+
Downloads

Everyone
info
About this app
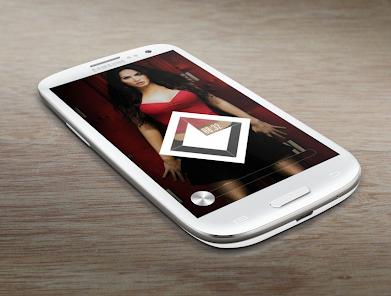
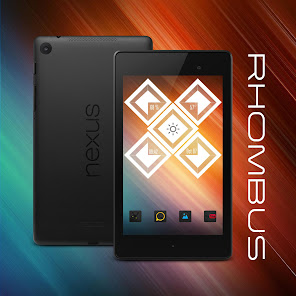
I proudly present to you - Rhombus UCCW Skins. This is a set of FIVE individual skins. You can place them all together on a single screen and get the totally out-of-the-world screen setup, as shown in the Nexus 7 screenshots. Or you can place them on per screen and ogle at them, no matter which screen you are on.
== FEATURES ==
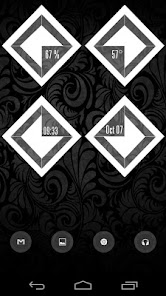
* Rhombus-Battery: The skin at the top left of the screenshot. Shows current battery level.
* Rhombus-Temperature: The skin at the top right of the screenshot. Shows current temperature.
* Rhombus-Time: The skin at the bottom left of the screenshot. Shows current time.
* Rhombus-Date: The skin at the bottom right of the screenshot. Shows current date.
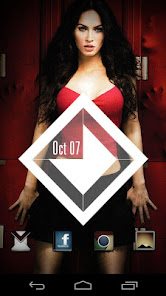
* Rhombus-Weather: The skin at the center of the 1st screenshot. Shows current weather condition with a cute icon.
* Each skin has one editable hotspot. You can assign your favorite apps to them and change the color or the text too.
== INSTRUCTIONS ==
To use this skin, you have to install, apply and optionally edit/assign hotspots to the skin.
Install -
* After downloading the skin app from play store, launch it.
* Tap "Install Skin" button in the app.
* Tap "Ok" when it asks you whether you want to replace app. This step is replacing the skin installer with the actual skin. OR
* If you are using a KitKat device, it'll ask whether you want to update the existing app.
* Tap "Install". When that finishes, tap "Done". Skin is now installed.
Apply -
* You must have latest version of Ultimate custom widget (UCCW) installed. http://goo.gl/eDQjG
* Place a UCCW widget of 2x2 size on the homescreen. You can do so by dragging the widget from app drawer or by long pressing homescreen to pull up widget menu.
* This will open the skins list. Skins installed from play store will show up ONLY HERE.
* Tap on the skin you want to apply and it'll be applied to the widget.
* Long press on the widget and resize it as & if necessary.
Edit -
* After applying the skin as mentioned above, launch UCCW app itself. Tap Menu, tap "hotspot mode" and tap 'OFF'. UCCW will exit.
* Now tap anywhere on the uccw widget. It'll open in uccw edit window.
* Scroll through the components in the bottom half of the screen. Assign apps to hotspots in this window. This IS a MUST.
* You can change color, format etc too (optional) in this window.
* When done, no need to save. That won't work. Simply tap Menu, tap "hotspot mode" and tap 'ON'. UCCW will exit. Your changes will now be applied to the widget.
These instructions are also shown in the attached video.
== TIPS / TROUBLESHOOT ==
* If the "Install" step fails; go to Android settings > Security and make sure "Unknown sources" is enabled. Reason explained here - http://wizardworkapps.blogspot.com/2013/12/ultimate-custom-widgets-uccw-tutorial.html
* To change temperature unit between Celsius and Fahrenheit -> Launch UCCW app itself. Tap Menu, tap settings. Here, if "Celsius" is marked, temperature will display in Celsius. If unmarked, Fahrenheit.
* If weather info is not displayed/updated, Launch UCCW app itself. Tap Menu, tap settings, tap location. Make sure "Auto location" is checked and that the third row is correctly showing your location.
* You can also tap Menu, tap settings, tap 'weather provider' and change the selected provider.
Mail me if you have ANY issues.
== FEATURES ==
* Rhombus-Battery: The skin at the top left of the screenshot. Shows current battery level.
* Rhombus-Temperature: The skin at the top right of the screenshot. Shows current temperature.
* Rhombus-Time: The skin at the bottom left of the screenshot. Shows current time.
* Rhombus-Date: The skin at the bottom right of the screenshot. Shows current date.
* Rhombus-Weather: The skin at the center of the 1st screenshot. Shows current weather condition with a cute icon.
* Each skin has one editable hotspot. You can assign your favorite apps to them and change the color or the text too.
== INSTRUCTIONS ==
To use this skin, you have to install, apply and optionally edit/assign hotspots to the skin.
Install -
* After downloading the skin app from play store, launch it.
* Tap "Install Skin" button in the app.
* Tap "Ok" when it asks you whether you want to replace app. This step is replacing the skin installer with the actual skin. OR
* If you are using a KitKat device, it'll ask whether you want to update the existing app.
* Tap "Install". When that finishes, tap "Done". Skin is now installed.
Apply -
* You must have latest version of Ultimate custom widget (UCCW) installed. http://goo.gl/eDQjG
* Place a UCCW widget of 2x2 size on the homescreen. You can do so by dragging the widget from app drawer or by long pressing homescreen to pull up widget menu.
* This will open the skins list. Skins installed from play store will show up ONLY HERE.
* Tap on the skin you want to apply and it'll be applied to the widget.
* Long press on the widget and resize it as & if necessary.
Edit -
* After applying the skin as mentioned above, launch UCCW app itself. Tap Menu, tap "hotspot mode" and tap 'OFF'. UCCW will exit.
* Now tap anywhere on the uccw widget. It'll open in uccw edit window.
* Scroll through the components in the bottom half of the screen. Assign apps to hotspots in this window. This IS a MUST.
* You can change color, format etc too (optional) in this window.
* When done, no need to save. That won't work. Simply tap Menu, tap "hotspot mode" and tap 'ON'. UCCW will exit. Your changes will now be applied to the widget.
These instructions are also shown in the attached video.
== TIPS / TROUBLESHOOT ==
* If the "Install" step fails; go to Android settings > Security and make sure "Unknown sources" is enabled. Reason explained here - http://wizardworkapps.blogspot.com/2013/12/ultimate-custom-widgets-uccw-tutorial.html
* To change temperature unit between Celsius and Fahrenheit -> Launch UCCW app itself. Tap Menu, tap settings. Here, if "Celsius" is marked, temperature will display in Celsius. If unmarked, Fahrenheit.
* If weather info is not displayed/updated, Launch UCCW app itself. Tap Menu, tap settings, tap location. Make sure "Auto location" is checked and that the third row is correctly showing your location.
* You can also tap Menu, tap settings, tap 'weather provider' and change the selected provider.
Mail me if you have ANY issues.
Updated on
Safety starts with understanding how developers collect and share your data. Data privacy and security practices may vary based on your use, region, and age. The developer provided this information and may update it over time.

No data shared with third parties
Learn more about how developers declare sharing

No data collected
Learn more about how developers declare collection
What’s new
v1.1
* App doesn't need any permission now. Yayy.
* Easier to use. This is no longer a skin installer. This is the skin app itself. After update, the skin will be directly available to apply.
* App doesn't need any permission now. Yayy.
* Easier to use. This is no longer a skin installer. This is the skin app itself. After update, the skin will be directly available to apply.
App support
About the developer
Bikram Agarwal
wizardwork.apps@gmail.com
Bazarpara Ward No. 10
Birbhum
Rampurhat, West Bengal 731224
India
undefined


